
How Dawn of the Monsters integrated 2D and 3D
Giving DotM its unique looks
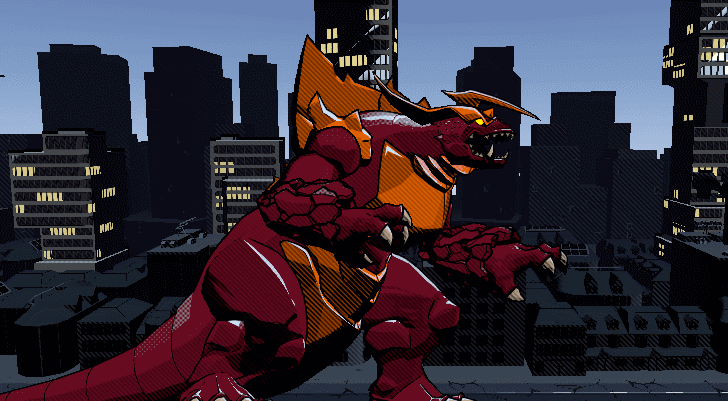
Due to our kaiju inspirations, one of the most important things we had to achieve with Dawn of the Monsters was satisfying environmental destruction. This, paired with the fact that our characters are bigger than most of the environment—making buildings gameplay elements, instead of backdrops—means 3D offered more interesting and dynamic solutions.
But 13AM’s passion and expertise lies in lovingly crafted 2D animated characters, which are the best way to portray our love for comics and anime. So how could we connect the two and get the best of both worlds?
Our solution to this problem was emulating 3D lighting on our 2D characters, which helped to integrate them with the environment.
This is achieved by using hand-painted normals in our 2D characters and developing a special shader that replicates a 2D look on our 3D models. The goal is to close the visual gap between both elements, so that they blend together in a cohesive look. Our 2D characters are carefully rendered to add volume to them, while our 3D environments are manipulated so they appear flatter. By using this technique we can achieve a cel shaded look for both the character and the environments that blend them together nicely and creates an integrated look that fools even the more observant eyes (for those who thought our characters were 3D… gotcha 😉).
This is easier said than done however. Hand painting normals is a complex technique that took a lot of experimentation to develop. And the cel shaded look makes it so that you have to be extra careful with overlapping volumes. Let’s take a look at how they’re crafted and what goes into each character!

The software we use for our animations is Spine2D, a skeletal animation software that allows you to attach art pieces to a skeleton and animate them, similar to how 3D animation works. Spine has very useful tools that allow for advanced animation techniques, such as mesh deformation (deforming art pieces based on different bone influences), bone constraints and IKs, asset swapping, and much more. One very important feature of Spine is that it exports animations as code—which means that the animations are much lighter than if exported frame by frame, helping the game run smoother and the graphics to have higher resolution.
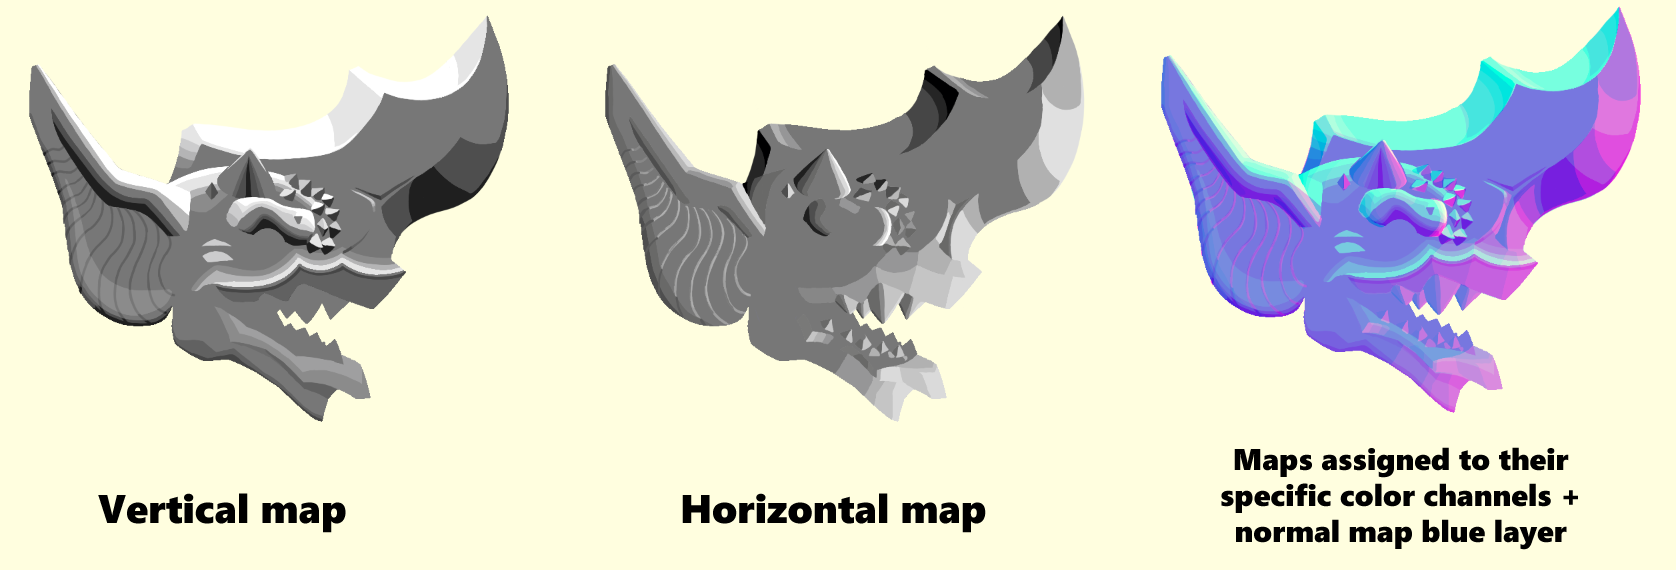
Due to our normal painting process, we divide each asset into three different versions: Outline, Normal Map, and Index Map.
The outline layer is only the black lines of the character, filled with white. This is layered over the other two maps to make the final outline of the character.
The normal map is the volume information of the character—it tells the engine where to shade light and where to cast shadows when turning the light around.
The index map is the base information of the color separation of the character. The colors are later substituted by the engine based on what palette your character has equipped, or what enemy variation it is.
Those three atlases get combined to create the final visual of the character by the magic shader developed by our tech director Marty. You can check out his thread about the shader here!
Normal maps look scary and hard to interpret at a glance, but they’re very simple to build: you just need to paint two layers indicating the volume—a Vertical one and a Horizontal one—and overlap those layers on top of another layer filled with a default shade of Blue used for normal maps. Those layers are painted in shades of gray, but by assigning each layer to a specific color channel you get the color information used by 3D engines to interpret the volume.
• In the Horizontal map we have the horizontal volume information, with lighter shades pointing to the right and darker shades pointing to the left. This map is assigned to the Red channel.
• In the Vertical map we have the vertical volume information, with lighter shades indicating the plane is pointing up and darker shades indicating the plane is pointing down. This map is assigned to the Green channel.
It all took a lot of trial and error. Figuring out the right shades of gray that would translate into the best cell shaded effect, experimenting with the way the horizontal and vertical maps interacted, how much information to paint on each of them… But at the end we arrived at a result that interacts with lighting in a great way and looks like it was taken right out of a comic.
There are some limitations that arose with this technique. The art assets cannot be rotated when being bundled in a sprite atlas, because it would change the direction of the normals information. Bones cannot be inverted during animations, as it makes the piece be lit from the opposite direction.
But this method allowed us to make use of dynamic lighting and present our characters in a variety of environments, creating the stunning visuals the game is known for.

Juli Ivy (@twitter handle here) will send me the information to fill this part.